This snare fell into my lap through eBay for just 30 something Euro, and quite frankly, at first I thought that even that was too much money! It was obvious that this drum had been badly stored in someone’s cellar or attic for the last decades. But I just love vintage drums, and I hate to see them rot away, so I thought why not try to bring it back to life.

Surprise: underneath the dust and dirt, I recovered a beautiful shell, the parallel action still worked, all parts of the mechanism (strainer, snare wire hookup) were there and although a bit shaken, they did function, and the old metric drumheads were also still intact.

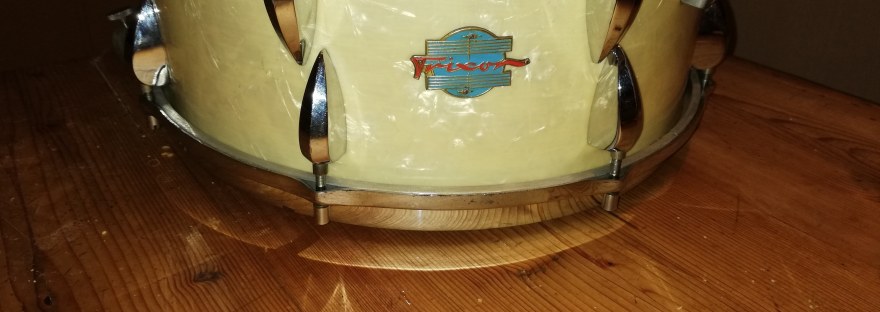
The only real problem were the lugs. Those early Fifties Trixon lugs (type B little; 1949-1956) with the screws wielded to the lugs are often crumbling away, especially if the drums are stored in humid surroundings for decades. To find any original replacement parts is close to impossible. If you ever find a drum with these old lugs still in place and intact: don’t touch them! Just leave them as they are and do not put too much tension on them with highly tuned drumheads. In my case, all except for two lugs were broken or deformed.


With replacement lugs out of reach, I checked my possibilities to switch to the next generation of Trixon lugs (type D little; 1956-1963), which look absolutely identical from the outside. I was able to get some pretty good ones from my Trixon buddy Ingo Winterberg, but…the on the inside the newer lugs have different measurements. Instead of the 46mm distance between the screws on the older lugs, the screw entrances on the newer lugs are only 42mm apart, plus the lugs feature 5mm wide entrances, whereas the screws on the older lugs only needed holes of 3 mm diameter in the shell.

So to install these lugs, I would have to work on the shell. I took some time to think about it. I am not a collector in the first place, I am a player. I wanted to play this drum. The only way to revive this drum and make music with it, would be to work on the shell. So I finally made the decision to do it, even if it meant to not keep the drum in an original and unaltered state.

First, I had to make sure, that the lugs would stay in exactly the same place as the previous ones, as otherwise, you would see the difference in the color of the WMP finish, which had of course aged differently underneath and outside of the lugs. Every single lug hole on the shell had to be carefully opened further towards each other for about 2 mm, and then widened from 3 to 5 mm. I widened the very first hole a bit too much, a lesson for the ones still ahead!


The good news was that the lug would still be held in place and could not wobble around, as it could be the case if I would have had to widen the distance outwards. The work on the holes underneath the thinner tip of the lugs was especially delicate, as the widened holes are really just one hair away from edges of the lugs. If you widen just a little bit too much, there will be a visible gap in the shell besides the lug. I was very lucky to the stay within the range with all lugs. The wider lug holes are not visible from the inside of the drum either, they are complete hidden under the washers of the screws.

Another problem presented itself on one of the hookups for the snare wires. The thread for only of the tension screws was partly destroyed. These old Trixon hookups were made of aluminum and they are very fragile, just as the old lugs, they have a tendency to fall apart after 70 years. Cutting a bigger thread into them would surely have destroyed them, so it was time for another experiment.


Using thermoplastic, a heat reactive reformable plastic, I pressed it into the corner of the hookup and partly into the hole, waited until it was half stiff again and then cut a thread into it using the original screw. It worked!! This actually has been working ever since and until I will find a replacement (or the Trixon pope Ingo Winterberg will finally print some on his 3 D printer), this is the way!

In retrospect I am happy with my decision to break the „never screw any new holes into vintage drums“ rule, as only this way, I was able to give back life to this beautiful snare drum. It has since become one of my favourite and most regularly used snare drums. It sounds very crisp due to the thin shell and has a lot of punch, especially when playing rimshots. After years of experimenting with different metric drumheads such as those from stdrums or other suppliers in Germany (which sadly only produce very basic white one ply drumheads and those never really satified me), I then switched to natural calfskin heads (re-using one of the rims of the original metric Weatherking drumhead after it had finally broken). Learning how to attach the wet animal skin to the rim will become a post by itself. Trial and error, nervous breakdowns and success lay very close to each other! Just recently I ordered two drum heads from Kolberg music store, which offer REMO custom made 14,29″ drumheads, which are expensive, but well worth the price (around 60-80 Euro), and I have never been more satisfied. They offer plain white Ambassador batter and Diplomat resonant heads, which sit very tight, but they do fit, at least on my vintage metric snare drums. If they don’t fit, you can return them to Kolberg. They also offer handmade Fyberskin batter heads, but those are a bit smaller (362 instead of 363 mm) and did sadly not fit on my drums. There are also REMO custom made coated Ambassador heads available on the internet, which cost around 100 Euro each.